Quantcast
Channel: Floorplanner.com weblog
Viewing all 33 articles
Browse latest View live

New dashboard, listings and actions

$
0
0
project actions Over the past weeks you may have noticed a few changes on your Floorplanner account: an improved dashboard; better project listings; and new project actions. Some of these are new features, while others are improvements of existing ones –
so let’s have a quick look at how they work and what’s new.


Dashboard
First of all, the dashboard has been updated. Recent projects should now tell you more at a glance, with a full rundown of the number of designs and floors in the project, its public or private visibility, and even a little thumbnail of the project itself. There’s also a news section featuring our Weblog, Facebook and Twitter feeds, where you’ll find new information and posts about new features – like this one! Finally, there’s a new introduction video to help new users get straight into drawing their floor plans.

Project listings
Next up, we’ve improved project listings. Your listings now show the number of designs and floors in your projects; private or public visibility; and the date the design was created, and when it was last modified. We’ve also placed the search bar in a more prominent position to make finding a project that little bit easier.

Project actions
Lastly, we’ve got a brand new feature: project actions. Actions make doing things with your floor plans much, much easier. Just hover over a project in your listings and you should see a new “Actions” button, giving you quick access to a wide range of operations: duplication, moving a floor plan to another user, collaboration, or even downloading the FML file – and these are just a few of the possible actions available. Actions are also contextual, so depending on the status of the project (basic, private, published), you’ll have different actions available to you – keeping things streamlined, quick and clean.

So get dashboard-ing, listing-ing and actioning – we’ve got plenty more coming up!


Faster image export

$
0
0
image export Though it’s tempting to kick back with a cool drink here in sunny Rotterdam, we’ve been working hard to improve your experience on Floorplanner. And last week, we released a big update to image exporting.

And when we say big, we mean big: we’ve built an entirely new system to handle the generation of floor plan images. It’s much more efficient, and this means we can do some exciting new things – starting with making image exporting available to everyone.

In the past, image exporting was only available to paid users of Floorplanner. But with the new system, users with Basic accounts can now export their floor plans to a 640x480 JPG file – perfect for your blog, Facebook profile, or Twitter.

Users with Plus accounts will now find they can export images all the way up to 2100x2800 pixels in size, a little over double what was available prior to the update. This means that whereas previously exported images could be used as a modest desktop wallpaper, it’s now possible to export images that will look clean and crisp in print.

Pro account users will see the most welcome changes, and for us, this is what the new system was built for. The first thing users will notice is that the new system is much faster, and far more stable. We hope that this alone will make an enormous difference to Pro account users’ experiences when exporting images. The second major difference is that image scaling has changed: whereas previously all designs in a project were resized to fit the image – making the scale of a large ground floor mismatch a smaller attic, for instance – now all designs are exported to the same scale, eliminating any confusion regarding mysteriously growing rooms.

Finally, we’ve added image exporting to the Floorplanner API. This means that portals and users with API access can request an image of any design in any size they like, and it’s as simple as that.

So we hope that you’ll find sharing and printing your floor plans easier than ever before, and we’ll be keeping you up to date with more improvements over the Summer.

Simpler accounts

$
0
0

We are always working on improving our service. Normally, we take small steps: we fix a bug, we change the page layout, or add a new feature. However, some issues can't be solved this way. Some require us to make big changes. This week we rolled out a major update that simplifies our account system: making it easier for users to understand, and better for us to manage.

Projects, not publishings

You signed up to Floorplanner to create and share floor plans, and that's what we want to make as easy as possible. We also want floor plans to be the core metric of our accounts: not the number of active published projects, but the number of projects total. This is a more straightforward metric, making it easier for you to work with Floorplanner. You will get a number of projects per month/year and you can decide for yourself what you want to do with them: export a project as an image, publish it, or put it on your website or download it as an FML file.

Take a look at our new plans & pricing page.

Less accounts

Over the last few years, our account system has grown to accommodate 14 different account types. It's become too complex and it's time to change that. So we're cutting that number down to 5 accounts. For private users, we have the free Basic account and the upgraded Plus account. For professional users we have three Pro accounts (Pro S, Pro M and Pro L), depending on the usage. The Partner account is for companies that want to partner with us and work with our API.

Seamless change

Most users won't notice any changes, so you'll still be able to use Floorplanner the way you always do. If you do encounter a problem, please contact us so we can help you right away.

My account improvements

$
0
0
image export

We know that clicking matters. Every click counts towards the experience of Floorplanner.com - for better or worse - and the latest target of our click-awareness scheme is account information.

This kind information can be found in all kinds of places on the Floorplanner website – sometimes where people may not necessarily expect them to be. For our Plus and Pro customers this could become a little complicated, as you'd find your company details under one menu, invoices somewhere else, and subscriptions under another heading – it all adds up to a lot of clicking.

With that in mind, we've made things simpler for Plus and Pro customers and gathered all this information into the most logical place, the Floorplanner account page. From here you can oversee and modify your account to your heart's desire. Here's a quick overview, fittingly starting with the overview.

Overview

This tab gives you a quick look at your profile and company information, your latest invoices, and how many projects you've used out of your monthly allowance.

Profile

Here it's possible to modify all your account details, from your name to your profile picture. You can also change the language you'd like to use and what kind of measurement system you prefer, along with a few other options like changing your password or subscribing to the Floorplanner newsletter.

Company Info

Changed your company name? VAT number? Moved your headquarters to Brazil? Here you can edit your company details to reflect any recent changes to your business.

Invoices

From this tab it's not only possible to see all your recent invoices, their dates of payment and other details, but also to download them in PDF format.

Subscription

Lastly you can see your current subscription plan, alongside its monthly cost and associated benefits. You can also upgrade to other plans, cancel your current subscription, and see how much you can save if you pay per year.

And that's it. One heading, five menus, and far fewer clicks.

Moving Furniture Around

$
0
0
image export

A floor plan without furniture would be little more than a square. Without it, there would be nowhere to sit, lie, write, eat, or tastefully arrange architecture magazines upon. So, it goes without saying that furniture is a big part of what makes Floorplanner Floorplanner, so we're happy to announce a big change to the way you use furniture on the site.

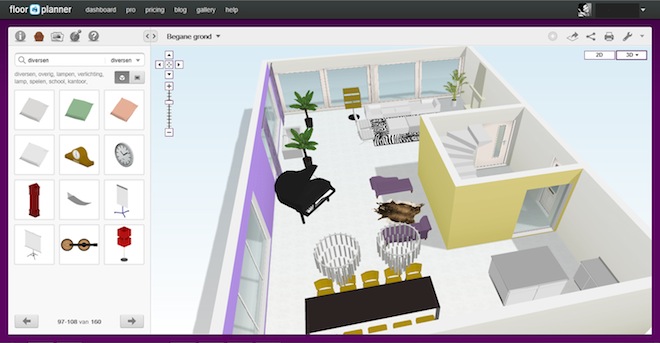
First of all, we've moved our massive furniture library out of the library window and into the sidebar – a lot of heavy lifting. As stated earlier, good furniture is one of the foundations of a good floor plan, and we've made this choice in order to bring it to the forefront of the Floorplanner experience.

Not only is the new sidebar view more spacious, but it will also introduce you to something you should notice straight away: all of our furniture is now rendered in 3D, making it much clearer as to exactly what you're putting in your floor plan. What was previously a brown circle is now a table. Two ovals now find themselves to be an office chair. The benefits are obvious.

And finally, we've added something that is going to make populating floor plans with furniture a snap, and that's search. All furniture is now searchable, which means you can get a quick look at lamps, desks, mats – or whatever you like – whenever it takes your fancy. Just search.

Improvements before the New Year

$
0
0

2012 is almost here and before the holidays we rolled out a string of updates and new features. And there is more to come in the new year. In this blog post we will highlight some of the smaller and bigger changes we have made to our site these past weeks.

Layout improvements

In 2011 we’ve been rolling out our new layout but there were still some parts of our site that needed to be updated with the new look & feel. For instance the editing & viewing pages and the general dashboard pages that you come across when you are logged in. There is now more consistency throughout the site and the sidebar menu takes up less space.

The same page structure has been implemented within the view & edit pages. Besides being more efficient in terms of used space, this means they also look better when published or shared. By simplifying things both visually & technically we have also increased the general speed of our website significantly.


No more ads

Another thing that might be noticed by our Free users is that we got rid of the ads on our website as we think this this improves the general user experience and also the speed. In time we might experiment with some new sponsored content options that contribute to the general usability but for now the ads are gone leaving more room for new features we are working on.


image export

Furniture menu

More noticeable for all our users: we have finally made the step to move the libraries to the sidebar. Some of the most requested changes regarding the libraries were the ability to search, see objects in 3D, have larger thumbnails and see more furniture at the same time. Because the amount of objects has been growing to an amount that was difficult to manage and oversee, a new search-based interface was necessary. Tags will help you find more selective sets like “design”, “gymnastics”, “ikea” or “cabinets”.

This hasn’t come without bumps and we are aware it’s still not perfect. We wish to thank all people commenting on the forums for their valuable feedback so far. In the coming year we will work towards more options for customization, like bookmarking items you use more often or furniture suggestions based upon the type of plan you’re making. Our libraries will be further expanding as always and get more specialized. We are open for your suggestions, just let us know!


3D server side rendering

We started beta-testing our new 3D serverside renderings. This feature (PRO users only) allows you to create a more detailed, lively image from your 3D plans in high resolution. With a simple 2 click operation you can have images sent to you by mail in a matter of minutes. These images can be used in brochures and websites and have a quality that you would normally have to pay someone for to achieve. We are aware that there is a lot of room for improvement and that is why we are rolling it out as a beta so, as always, feedback is appreciated as we will further improve upon this. We can’t wait to see the images you will be producing with this new feature.

image export

More to come in 2012

Finally, we wish you all a very merry Christmas and all the best for the coming year. We have lots of new features and improvements lined up so drop by regularly. Happy planning in 2012!


Vote for new items

$
0
0

Usually we get lots of questions about specific items that people want through our forum or support mail. Now we’d like to turn this around, we’re going to ask you what you want us to make, so we can prioritize a certain topic. For this, we’re having a facebook poll on a bunch of topic sets. So please, give us your opinion!

To make you enthusiastic, we already made an example collection for warehouse items. Just search for “warehouse” in your sidebar.


warehouse items

Floorplanner on the Chrome Web Store

$
0
0

We have a little update for those of you using Google's Chrome: we released Floorplanner on the Chrome App Store.

For those of you who don't know, Chrome is a web browser (like Internet Explorer, Firefox or Safari) made by Google. It's based on Webkit, it's very fast, and also has something called The Chrome Web Store.

The Chrome Web Store allows you to add all kinds of things to your Chrome browser: Games, extensions, tools and bookmarks to your favourite websites from your Chrome dashboard. The new Floorplanner app is one of these bookmark apps, which means that you can jump straight into Floorplanner from your Chrome dashboard.

The app is free and can be launched from the Chrome Web Store. And if you like Floorplanner, we'd be very grateful if you could write a review for us!

chrome web store


Measuring and analyzing your space

$
0
0

Hi! I am Maartje. I’m an interior architect and an avid user of Floorplanner. A few times a month I will blog some ins and outs about interior design and I will give you tips on how to use Floorplanner.

Measuring and analyzing your space

This first week I will show you how to analyze and measure spaces before you use Floorplanner. A good research will save you lots of work afterwards! Be patient while analyzing your space. Work systematically.

To inspect a space or room you will need some tools. Most important are a tape-measure or laser-marker, a piece of paper, a pencil and a camera. If you are inspecting a big location it can be helpful to check if there is some existing documentary. You can use this as a base for your measuring.

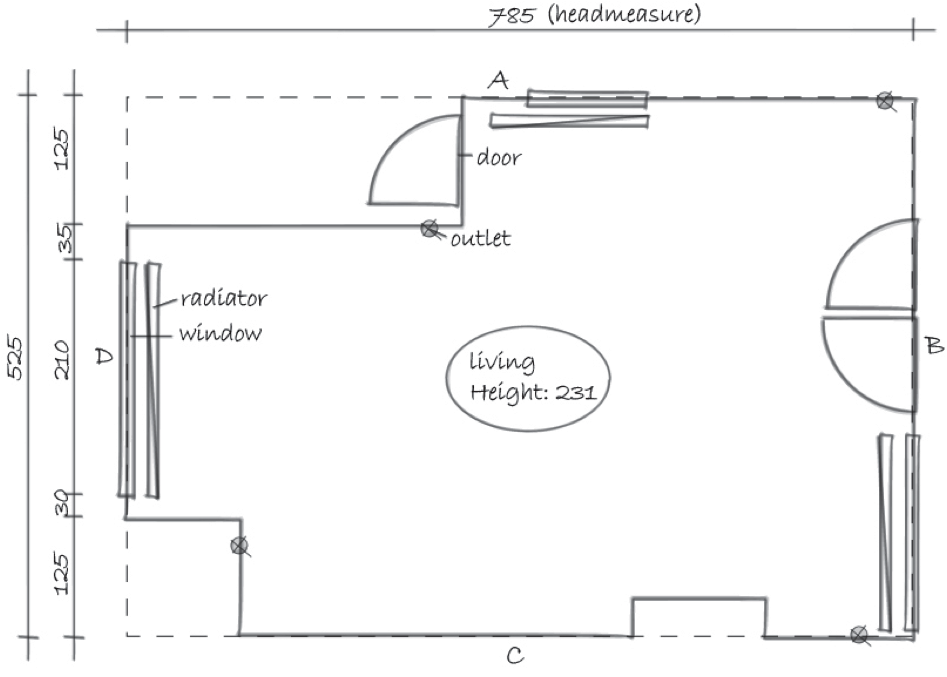
Measure the width and length of the space and sketch a square or rectangle in same ratio on your paper. It doesn´t need to have the exact same ratio as you space. You just need some guides (In the example I indicated the rectangle with a dashed line). Locate doors, windows, radiators, chimneys, stairs, niches and power outlets and sketch them in to your drawing. To indicate outlets you can use an X-sign. Indicate the direction in which doors rotate and mark all walls with a letter (A,B,C,D). Now you have a good base to write down the dimensions.

The measurement is best done by two people. If you´re on your own it´s easier to use a laser-marker. Before you start your detail-measurement, draw the head measure on the outside of your plan. Now measure everything clockwise. Write them down in cm or in mm (In the example I used cm).

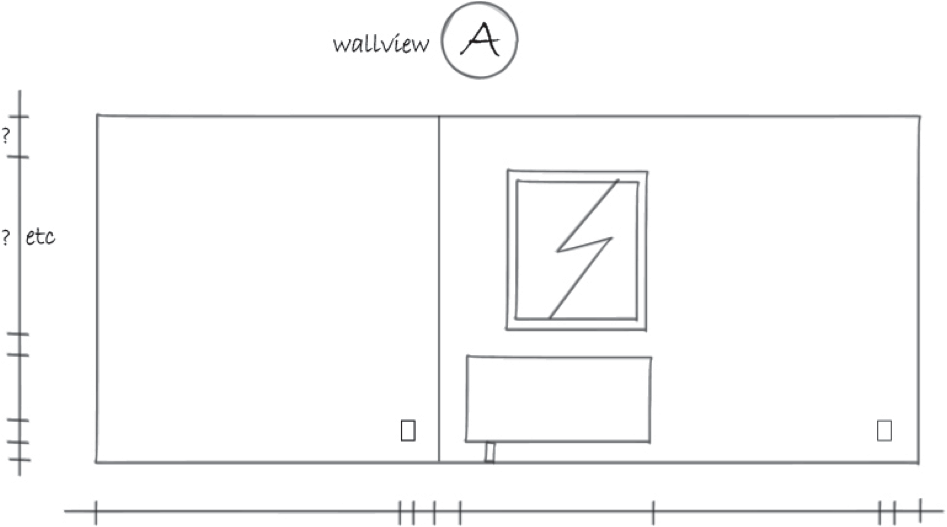
To point out heights of your windows, doors radiators etc. sketch all side-views down and measure all important heights. Mark the views with the right letter.

Last but not least is taking pictures. When you´re working out your project it´s always helpful to have good pictures to review. Take pictures from every corner of the room to the opposite corner. Then stand in the middle of the space and make pictures of every wall. Shoot some important details as well.

Now you are done!

Next post I will explain how to process all your research into Floorplanner!

Floorplanner experiments Part I

$
0
0
This is a guest post from Hyungoh Yoo from Korea. Hyungoh is using Floorplanner in surprising ways. His designs vary from cars, boats & planes to famous places. In the coming period there will be more posts from him showing what you can do with Floorplanner. You can check out his own website with many more lovely plans at : http://blog.naver.com/hoyoo83

Living room on the run?

One of my friends has been dreaming about purchasing a van. He really loves to make tours and journeys with all his family members. Recently he decided to buy a Mercedes-Benz Sprinter.


“From the outside this car does not look very extraordinary. What attracted me most was its interior design” he commented. “If I only see the interiors of this car, without the structural frame such as walls, windows and ceiling, I might call this car a living room”.

He continued that owing to its luxurious as well as cozy atmosphere passengers aboard feel just like in a living room, moving on the road.

Being equipped with total AV system that can be connected to office appliances,

Being equipped with an excellent AV system and office appliances, this vehicle can also be used as a moving office.

Living room or office, whatever it is…

I heard my friend saying “I wish I could change its interiors at anytime I want in the future”.

He believes that continuing change of the interior would make him use this car even longer, although he knows there is a limited range of choices as long as it is about car interiors

At that moment a good idea occured to my mind.

It seemed I could help him with Floorplanner.

It was almost like simulating interiors of a living room in a real house.

From the top in 2D

Looking at 32 inches LCD TV hooked up on the rear wall

Laptop computer on small table for mobile office


Looking inside through the rear

Looking inside through the front door


How can he have a wider selections for changes of colours, styles or something more serious? - like remodeling the car?

He could make trial and errors in the virtual space called Floorplanner

Previews of change of floor colours

Previews of change of seats in style

Previews of setting up window blinds or curtains, or a combination

Wanting to have this van remodeled for more cargo? If you take measures of the car body and the stuff which take the space of the cargo block, you can simulate it before carrying out the job.

Find out which style is right for you! (Part 1)

$
0
0

Last time I explained how you can measure your home in a simple way. Before we draw your sketches in Floorplanner, I’d like to explain how you can find out what style is right for you. This is useful to know before you decorate or rebuild your house. This first part is about creating a starting point for your interior design.

This style research also helps to bring more fun into making your drawings in Floorplanner because you give your technical research a personal twist. I’ve written down some questions you can ask yourself. This exercise is easy but by putting down a few key words you’ll have a good base to get you started.

Here are some questions you can ask yourself, your family or your customers:

  • What’s the function of the new space?
    Answer this question specifically. What do want to do here? What do others want to do here?
  • How many people use the space on daily bases? And who are these people?
    Children, for example, need more space.
  • Are there any requirements / wishes regarding color?
    Should it be light or dark? What shade appeals to me? What colors do I like and which I find just awful?
  • Are there any requirements / wishes regarding material?
    Do I like natural materials or not? Which textures appeal to me? Which fabrics do I like.
  • Are there any requirements with regards to atmosphere?
    Write down a few words which fit you (Clean, modern, industrial, retro, classic, bright, warm, cozy, basic, minimalistic etc.).
  • Which parts of the current interior should definitely stay and which should go?
  • What would I like to accentuate and what should I camouflage?
    For example, maybe you want to camouflage the heather but accentuate the fireplace. Or if you have a long space, keep it that way or make it look wider.

Some useful technical questions:

  • How is the natural lighting in the room?
  • What are fixed elements?
    (Windows, fireplaces, heaters, etc.)
  • What kind of facilities do you want?
    (Plumbing, electrics, data, lighting, etc.)

If you really take the time to answer these questions, you will surprise yourself! In part 2 of “Find out which style is right for you!” I’ll explain how to make a visual translation of the answers.

Export and share update

$
0
0

Last week we made a small update to Floorplanner's interface, and more specifically, the placement of sharing and exporting options.

When you've made a floor plan that you're happy with, you'll probably want to do something more than just look at it: share it with your friends, put it on your website, or export a 3D file to use in another application.

Floorplanner export and share

Previously these Sharing and Exporting options were located in the sidebar, but in light of how useful these features are we've moved them into the menu bar where they are more accessible.

What you're able to export depends on your membership: while Basic accounts have the option to export 640x480 images and scaled PDFs, Plus and Pro accounts get the option to export images all the way up to 2800x2100, as well as huge PDFs (up to 1:50 scale!), 3D models and renders.

So now's a better time than ever to share what you've been working on with your friends and family.

Find out which style is right for you! (Mood board, Part 2)

$
0
0

Today my blog will be about translating ideas into a mood board. Making a mood board is a good way to get a clear style. You can take it with you while shopping for interior items and use is at a good base to draw a space in a certain style in Floorplanner. In this example I pretended decorating a living space for Prince! (yes, the artist )

Function room: resting, lounging, hanging with friends.
People: 1, but need space for many people!
Colors: gold, dark purple, leopard prints, white.
Materials: velvet, gold, shiny materials, mosaic.
Atmosphere: Classic, kitsch, funny, unexpected, warm, sexy.
This must remain: couch with leopard print.
This must go: the rest
Enhance: fireplace
Camouflage: heating
Additional comments: can be funny and strange, but should nevertheless remain calm and classy.
Additional facilities: include a bath in the living room

Think over!

Now we convert the above images.
Tear images of home-magazines, but also lifestyle, garden, holiday and/or music-magazines. This will keep your mind open while designing. It is fun to do this with family or with the client you work for. If you don’t have magazines, it is also an idea to search for pictures on the internet.

No boundaries!

Collect as many images as possible. Take all that’s triggering you! Don’t think too long about it and do not consult with your partner. You can also make a stack of pictures that you find terrible. Then you know very clearly what you don’t want.
If you finished collecting then explain why these images appeal to you. Then decide together which you want to keep and which should go. If you work alone your lucky!
I'm searching on the internet without Prince and wondering what he would like…

Enjoy crafting!

Make a collage of the pictures from your Yes-stack. Add color samples and possibly also pieces of material to it. Results are sometimes surprising! Especially if you have a mood board made by more people. Be sure you're both happy with it.
I hope Prince will be happy with the one I made him!

mood board

Next time we will have a look how to use the library of Floorplanner in a way that it will match your style for the best.
Floorplanner has lots of choice in furniture and it’s good to know you can change color of every interior-item. Next to that you can give appropriate structures to floors and change colors of walls as well. If you really can’t find anything that looks like a special item you want in your interior just add a picture of that into your plan! More of that next time!

How to translate your mood board into Floorplanner

$
0
0

In the last blog I showed how to translate your wishes (or the wishes of your customers) into a mood board. This time I’ll show you how to translate your mood board into a floor plan and how to make use of the library to reflect your mood board ideas.

Start!

Start to draw your space. I will draw a big living room that includes kitchen and entrance for my client (yes, that’s still Prince). Use the manual of Floorplanner if you need some tips and tricks on how to draw your space. Keep your mood board and your questionnaire from previous blogs at hand so you can see what kind of atmosphere you should draw.

Layout plan

Think of a global layout. To design a living room you’ll have to make a layout plan first. What goes where? Where do I position my kitchen, lounge, dining area and any other features? A wish that Prince has is to have a bath in the living room. (see blog 2) For that I will provide a nice spot! Normally you will make a number of layouts to discuss with your client.

How to draw surfaces: Layout plan

Floor

After choosing your layout you can start designing. I’ll start with the floor. Because I want a marble floor that looks seamless, I used a concrete texture.
Tip: you can use other textures to express the materials you want to show by changing color.

Decorate

Now you can start using the Floorplanner furniture library. Floorplanner has lots of furniture and accessories that you can adjust in size and color. By coloring all furniture in the lounge area in the same tones and adding some color accent you will create a posh look and feel. And that’s what we want for Prince! J We should add some chaise lounges as well. In the library I found a model that’s close to what I had in mind, but I will add a picture of the exact piece I want. (see media-tool that you normally use to show interior pictures).

Layout plan

In the screen that pops up you can name your picture. You can also add the brand, size, price etc.. This way your client can see what furniture you recommend.

Layout plan

Browse your computer to add the right picture. Place the needle on the couch in your drawing (see red circle). An X-sign appears. When you click it the picture will show up.

Layout plan

Of course you can do this with multiple objects. Whether it’s for yourself or your client, it’s a fun and clear way to show your design!
Next time I will show you how to use the library to add accessories and spice up your design!
Good luck everybody!

Improved 3D visuals

$
0
0
3D visuals

We have some great news for all our premium subscribers: improved 3D visuals! The most important improvement? It makes your floor plans look really good in 3D. Besides that, it’s very easy and fast to create them. And last but certainly not least, there are no extra costs!

Premium accounts

The new 3D visuals are directly available for everyone with a premium account, without any additional costs. Real estate professionals with a Pro or a Partner account can create an unlimited amount of 3D visuals. People with a Plus account can create up to 25 visuals per year.

Easy export

You can create a 3D visual by clicking on the Export icon in the menu bar and selecting the ‘Render 3D image’ option. A menu appears that lets you choose the resolution and an angle of view. South east, south west, north west, north east and top down. Within a couple minutes you’ll receive an email with your 3D visuals attached.

Want more control? That’s possible too. Open you floor plan in the 3D view and move the view to a desired position. Now export it and the 3D visual will have a similar view to one on your screen.

Color wall tops

There is another very interesting feature that makes the 3D visuals even more attractive. You can color the wall tops yourself! This gives you the power to customize the look and feel of your 3D visuals.

Color wall tops

We just can’t wait to see your visuals!

Please use our forum for any remarks or suggestions.


Floorplanner now in Google Drive!

$
0
0

Google Drive Many organisations use Google Apps for email, calendars and documents. Today Google launched a new service called Google Drive. It allows people to store their files online , access them from any device and to collaborate with one another.

Why should you care? Because with this integration you can now store all your exports -3D visuals, 2D floor plans, PDFs etc- in one single, safe location. And, with Drive you can always access all your floor plan images from anywhere, anytime.

Chrome Web Store

You only have to do one thing to use Floorplanner together with Google Drive. Go to the Chrome Web Store and install the Floorplanner app. That’s it. All your exports will then be send automatically to your Drive. You can also open your floor plans from Drive, and you can create new floor plans from Drive. To create a new floor plan, click on Create > More > Floorplanner. You’ll be redirected to the Floorplanner 2D Editor where you can immediately work on your floor plan.

Permanently store your exports

Once you’ve installed the Floorplanner app, all your exports will be automatically stored in your Google Drive. You’ll still receive an email with the exported images or PDFs, but these files will also be directly available in your Drive too. The big advantage is that all the exports are stored permanently in Google Drive. From now on, you’ll always have a backup of every export you’ll make. Other advantages are that you can easily search through your floor plan images and you can access them from anywhere.

So, install the Floorplanner app and enjoy working in the cloud with Google Drive!

The effect of using accessories and color in a space

$
0
0

Color is very important to create atmosphere in a room. Because color can make a room seem larger or smaller. A space can even feel warmer or colder by using the right colors. In my drawing, I want a luxurious open feel. This I will achieve by using colors in a good way and by adding the right accessories.

A few tips:

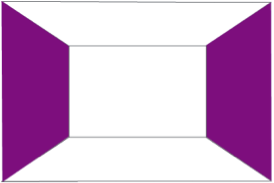
A dark color on both long walls makes your room look longer:
dark color on both long walls

If you make one wall darker the room appears to be wider.
one wall darker

Your ceiling will look lower when you color it dark. If you have a very high ceiling than it appears to be higher!
lower dark ceiling

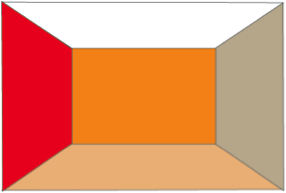
Warm colors will make your room look smaller and cozier.
warm color are cozy

Cool colors like blue, white, mint green and lilac often give a more spatial effect:
cool color are spatial

Balanced or unexpected?

If you stick to simple rules, you can create a successful color scheme. I show you two ways to do it:

Monochrome

To obtain a balanced result in your home it is best to choose one color and apply it in different shades on the walls but also in the accessories. We speak of monochromatic colors. This harmony we see in nature. For example in the shading of leaves and plants. These monochrome harmonies are often soothing and comfortable. In Floorplanner you can easily customize the color of your wall, as well as most accessories you find in the library.

monochrome colors

Complementary

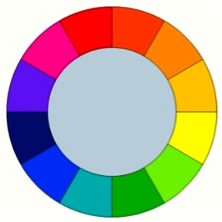
If you want to be more creative with your colors and accessories you can choose to use complementary colors. These are the colors facing each other in the color circle below.
Find a good balance if you use those colors. Make sure that a single color doesn’t take the upper hand. Blue for example is a calmer color than orange. In most cases you can use a lot of blue with an accent of orange to get the right balance.
For me that means I should add some yellow to my purple interior. Purple and yellow are both strong colors. I balanced 50/50 and kept the rest white and calm.

complementary colors
color wheel

What does it mean?

The color you choose for your room will be crucial. It is responsible for the feeling and the emotions it evokes in you. I’ll show you some facts about color and interior:

Red

Red is the color of passion. It is a very strong color that can work on the mind. It symbolizes fire, aggression, intensity, ... It stimulates. The stimulatory effect of red is best for areas with lots of motion, such as the entrance of the salon. In the entrance red gives you a warm and cordial feel. It gives character to your home and you immediately create a festive feeling. Also in the kitchen red is a good choice because it activates the appetite!

Orange

Orange represents energy and cheerfulness. An euphoric effect can easily be obtained with orange tints. If you prefer a more modest feel then go for earth tones. This gives a rich color scheme with a quiet and friendly atmosphere that can make your living room very sympathetic.

Yellow

Yellow often is very dominant when used bright. In different tones yellow brings coziness into a room. It’s a warm sunny color, even when it’s used in a light tone.

Green

Green is the color of nature and of peace. It ensures freshness, confidence and calmness. Good to use in a baby room or office.

Blue

Blue shades bring peace and make you clam. It brings a serene atmosphere. That’s why many bathrooms and bedrooms painted in blue because they help to relax.

Violet

Purple rooms always have a luxurious feel. It’s the color of wealth, spirituality and relaxation. Another advantage is that purple optically magnifies spaces.

White

White is the color of purity. It "purifies" the "neutralizes" the room. White surfaces or certain shades of white can light up a room. It may also increase contrast by coloring a wall while the rest is white.

My client wants to have a luxurious feel. Purple is perfect to create that. By adding some re furnishing and a wooden floor I created a bit more coziness and passion!...In your designs please try many combinations. Surprise yourself and your customers!
Have fun!

fun colors

FloorplanFinder iPad app

$
0
0

In case you haven’t noticed the enormous banner on your dashboard, we launched our first iPad app. It’s called the FloorplanFinder.

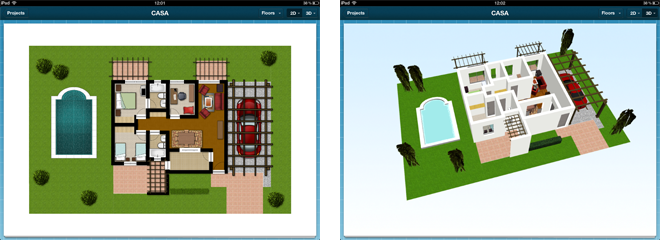
The FloorplanFinder is a great app to show and present the floor plans you made with the Floorplanner web app. Pan, zoom and navigate through your floor plans. Are you a real estate professional? Prospective home-buyers will love this presentation!

It’s also a great resource when you are looking for inspiration. Discover beautiful, clever and crazy floor plans by searching our immense database with over 6 million floor plans, all available in 2D & 3D. Or browse through other users' creations just for fun.

Take the FloorplanFinder for a spin and let us know what you think of it.

Magicplan & Floorplanner partner up

$
0
0

We at Floorplanner have been fans of the Magicplan iPhone app since the day it was released. Today we are proud to announce a new partnership between Sensopia/Magicplan and Floorplanner to bring the best of both worlds to floorplan creators worldwide.

So what can you do with this?

The Magicplan application allows you to create a floorplan by just using the camera on your iPhone. As the name suggests the process of just point and click and have an accurate floorplan created automatically for you feels a bit like magic and can be a real time saver to create floorplans for properties that do not have a floorplan yet.

Once you have captured the 2D floorplan within Magicplan 2.1 you can send it to your Floorplanner account where a new project is created that you can further edit, add furniture to and see in realtime 3D. Having your Magicplan floorplan imported into Floorplanner also allows you to created scaled drawings in PDF, export high resolution 3D images or publish your plan online so it can be viewed in an interactive way in both 2D as 3D. All this can be achieved without drawing 1 wall :-)

How can I start?

If you want to try this you can simply go to the iTunes store and install the Magicplan application (or upgrade your existing Magicplan application to the 2.1 version) and use the new share button in the interface. You have to make sure that you are logged into Magicplan with the same emailaddress you are using for your Floorplanner account and you also need to have enough space to create new projects.

Room for improvement

As this is the first version of the Magicplan/Floorplaner integration there might still be some issues so if you run into any bugs or other strange behavior please let us know at support@floorplanner.com and we will fix this.

New design furniture

$
0
0

A while ago we did a poll on what type of furniture you would like to see more. Design furniture was the winner, and doors and windows the close runner up. Today we’re happy to present a fine set of new elements!

We’ve added some classic designs of famous designers like Alvar Aalto and Gijs Bakker, but also more temporary designers like Van Seeveren, Las Palmas bar chairs and some Vitra furniture.

We also created a set of new windows like double hung windows, a more classic segmented one, and a small one for in stairways or bathrooms, etc. We hope you like it and that this will help you to get a better impression of your house.

A set of doors and other elements will follow as we are constantly adding new stuff to our libraries. Happy planning!

Viewing all 33 articles
Browse latest View live